How It Works
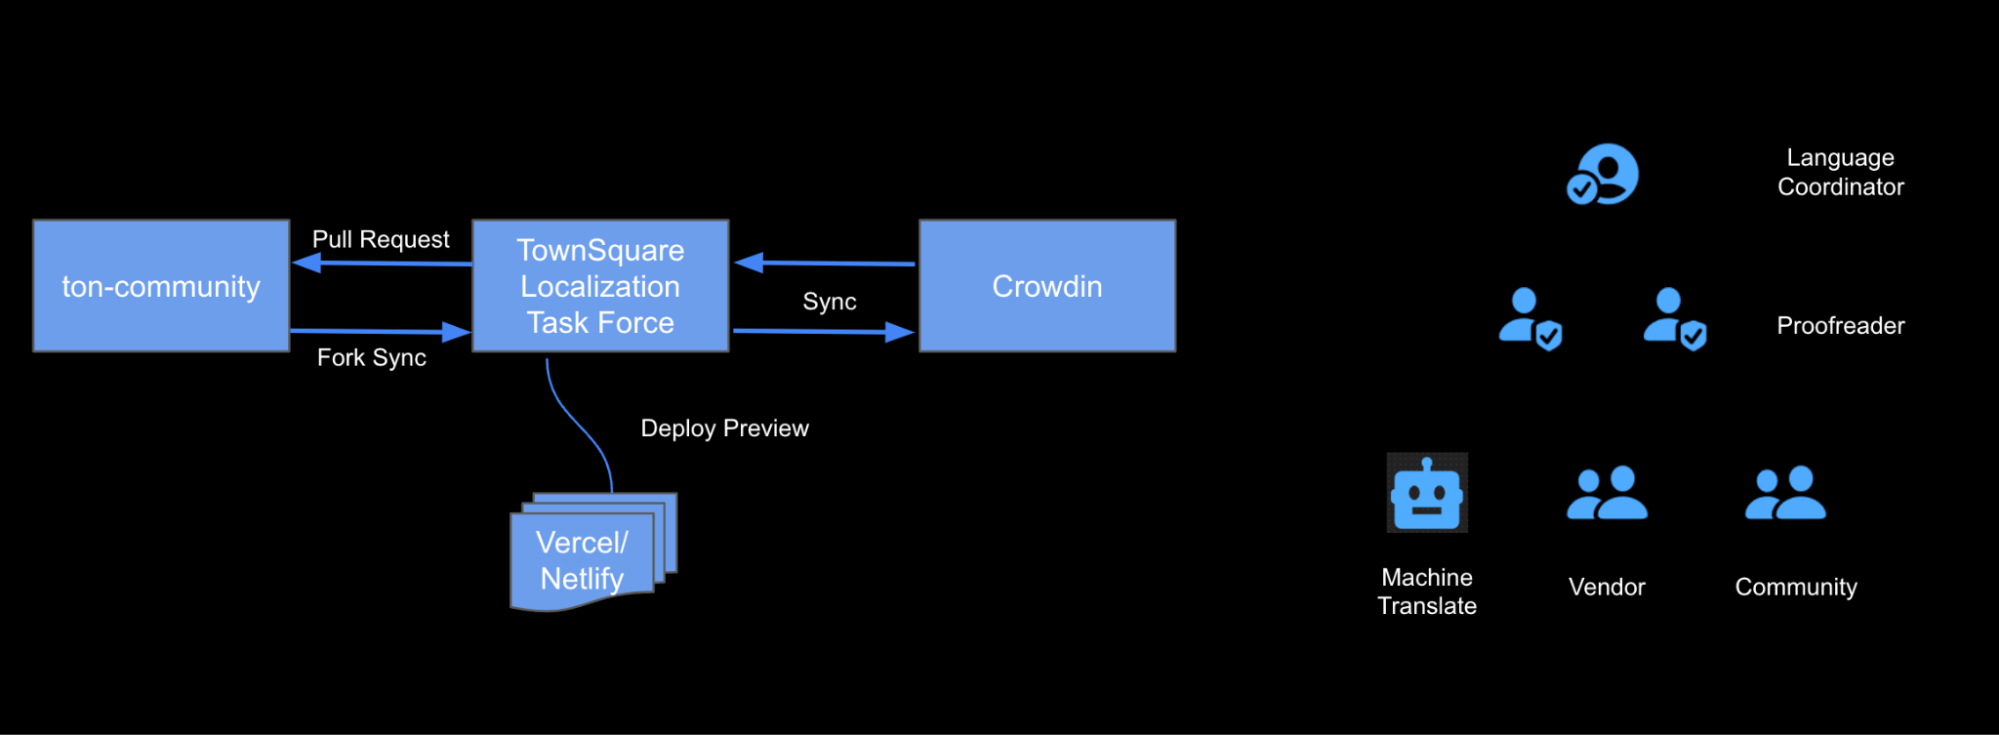
There are a few important parts in TownSquare Labs Localization Program, in this chapter, you'll know how this TownSquare Labs Localization Program worked in general, by getting into this deep, you can learn how to use it better.
In this whole system, we contain several applications, how do we combine them, use their benefit, and make them work like they are just one program naturally:
- GitHub - the docs are stored in here.
- Crowdin - here is the translation system part, we do translate, read proof, language setting...
- AI systems - we are using an advanced AI to help translators finish their jobs smoothly.
- Customization glossary - it will let translators know how to translate words and also make AI generate proper translates based on the project, and anyone can upload their glossary if needed.
We won't talk about how to finish the whole thing in this, but we want you to know those important and make this TownSquare Labs Localization Program unique parts, that you can try TownSquare Labs Localization Program yourself.
How to set up a new crowdin project?
Login your crowdin account.
Click
Create new projectin the menu.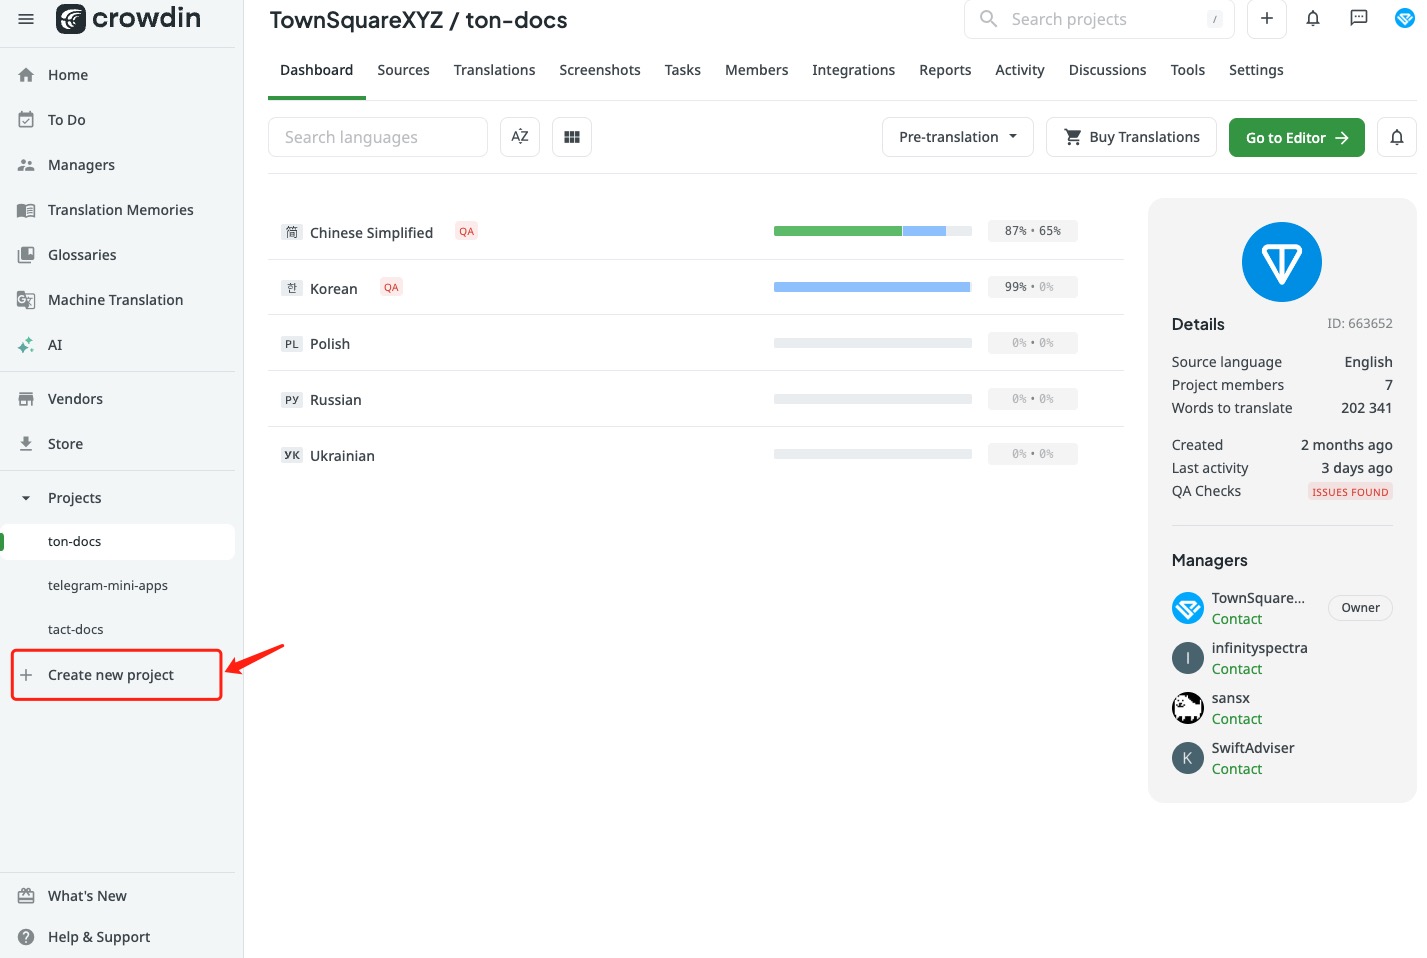
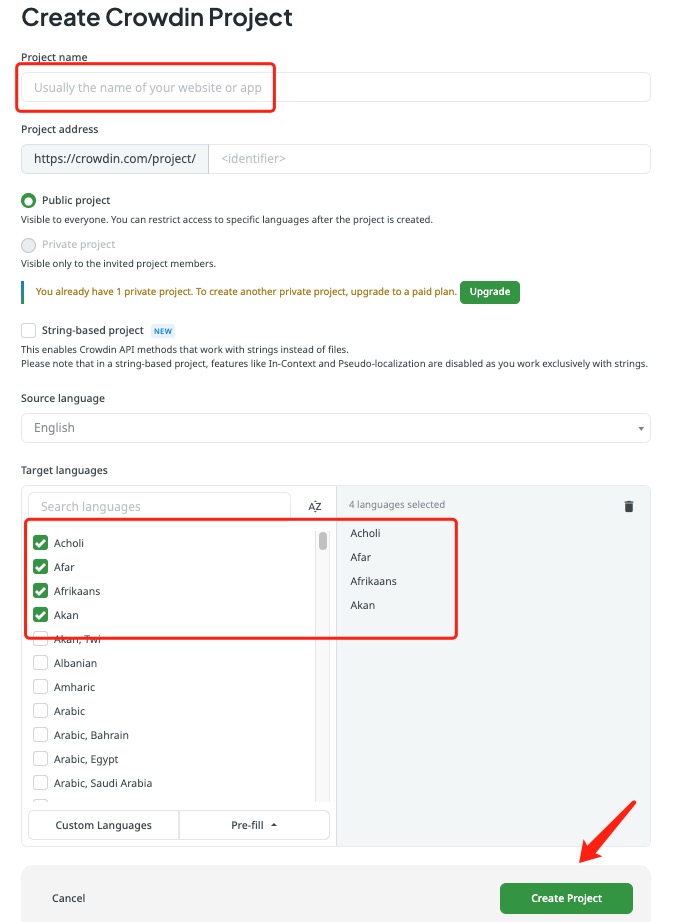
set your Project name and Target languages, languages can be changed in settings, so feel free to set what you want now.
go to the project you just created, select integrations tab, click
Add Integrationbutton, searchgithub, and install.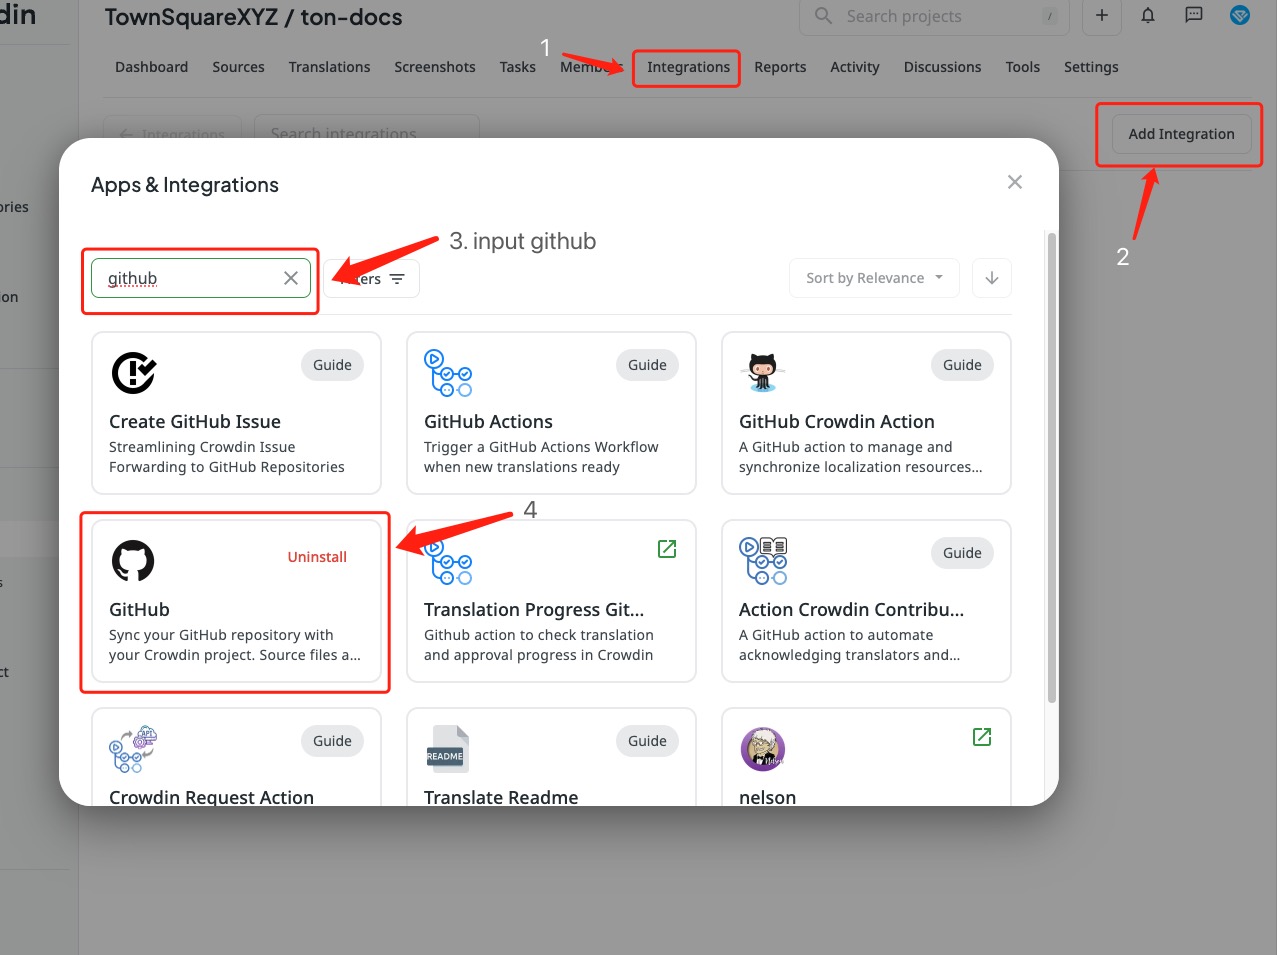
before we start setting github integrations on crowdin, we need to let crowdin know which files we wanna upload to crowdin to translate, otherwise the integrations will upload all files into crowdin, and it will be a disaster.
create a file called crowdin.yml in the root of your github repo, input the most fundamental configuration:
project_id: <Your project id>
preserve_hierarchy: 1
files:
  - source: <Path of your original files>
    translation: <Path of your translated files>
let's see how to get correct config value
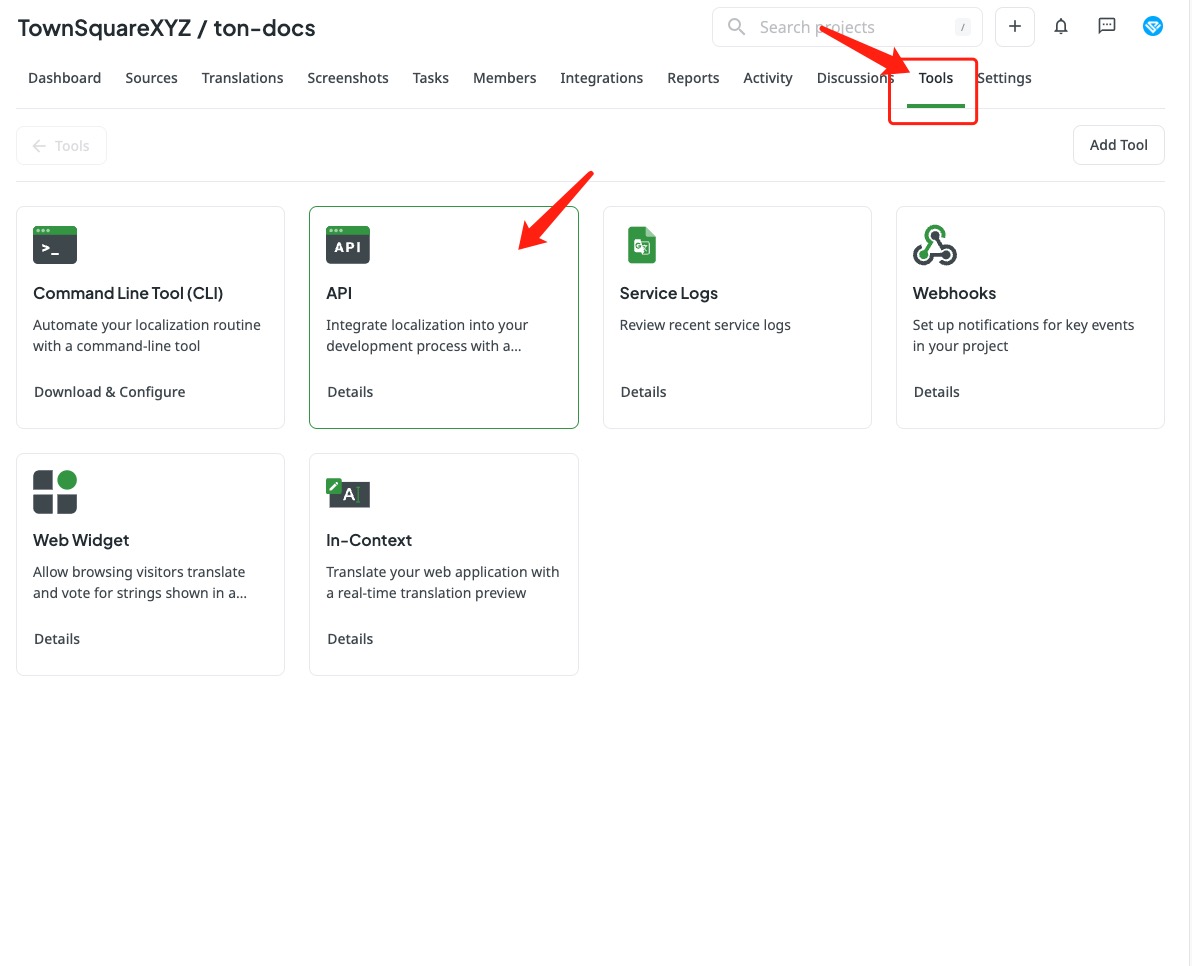
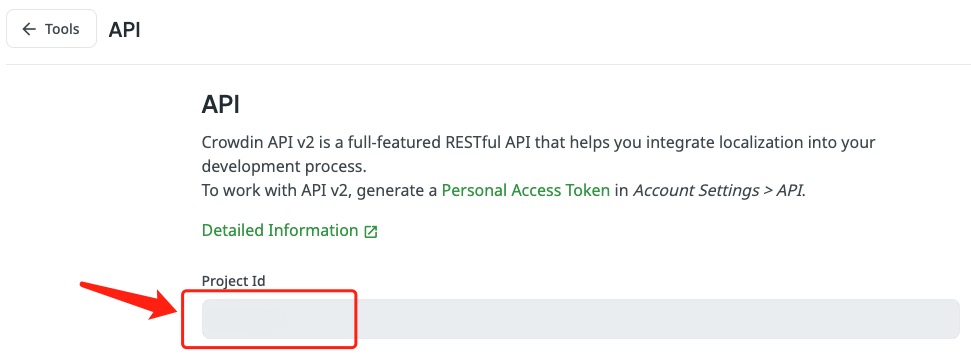
- project_id - back to your crowdin project, click tools tab, choose API item, and you get project_id there!
- preserve_hierarchy - means let uploaded files keep their github Directory Structure on crowdin Server, no need to change it.
- source and translation - there are two most important parts we need config in the files attribute, source means the path we wanna upload to crowdin, and translation means which path we wanna translate files output, we config it flexible, you can check our official config file as example.
- more detail about crowdin configuration
- project_id - back to your crowdin project, click tools tab, choose API item, and you get project_id there!
Okay, now we can back to crowdin setting integration to let crowdin connect to our github repo:
- click Add Repository select
Source and translation files mode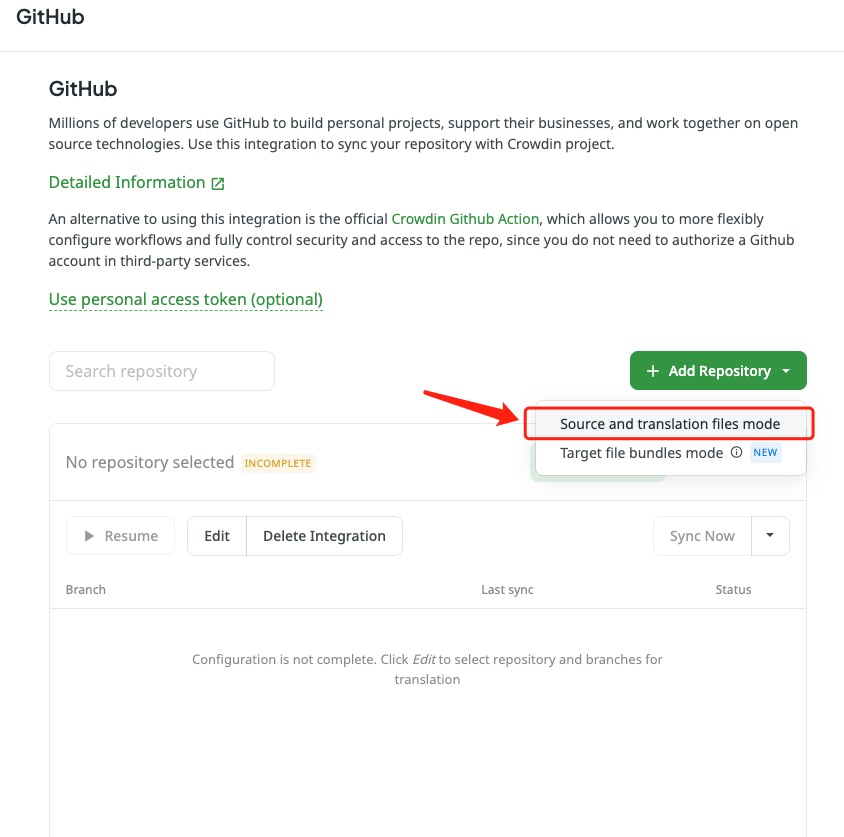
- it will connect GitHub account you current login,
- then you can search for the repo of the document you wanna translate
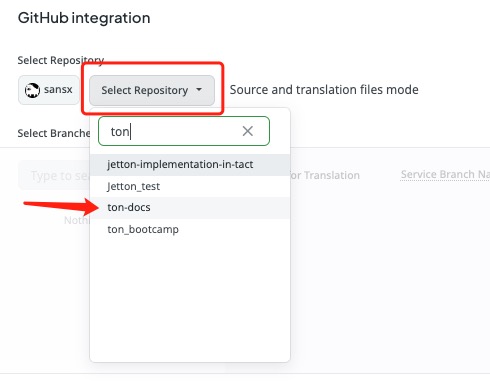
- select branch on the left, it will automatically generate a new branch where crowdin will post the translation to there
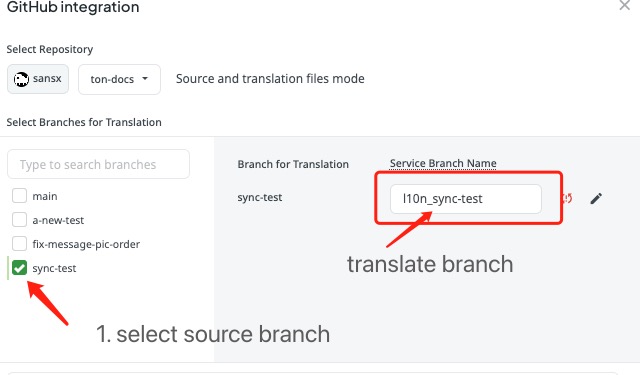
- choose the frequency of how often you wanna crowdin update translations to your github branch.
- other config we can just keep it as default, then click save to enable this integration.
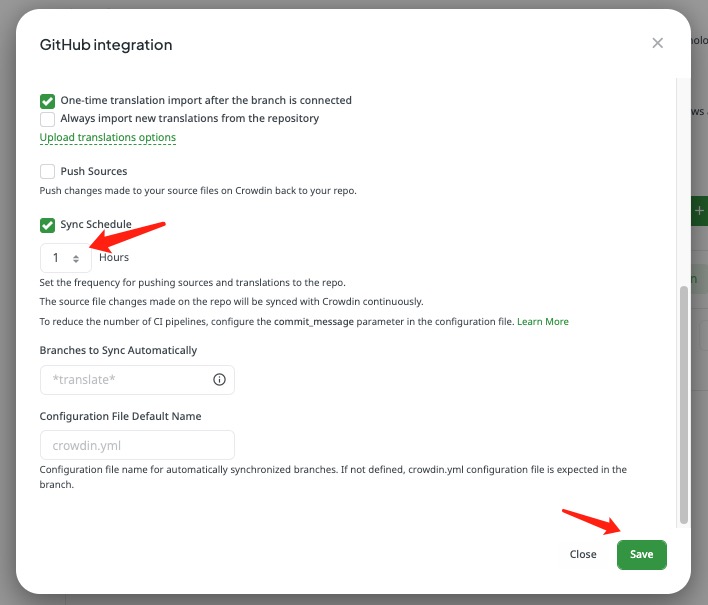
- then you can search for the repo of the document you wanna translate
- click Add Repository select
and we finally did it, you can click
Sync Nowbutton to Sync repo and translations any time you want
Glossary
What’s glossary?
it's very often, that when we use AI translators they can't recognize some words that shouldn't be translated.
for example, we don't want them to translate Rust when we talk about it as a programming language, sometimes even human translators will make similar mistakes, we don't wanna see such things keep happening, and we can make it better that's why we need glossary to manners their translation.
With a glossary, you can create, store, and manage all the project terminology in one place. The main aim of terminology is to explain some specific terms or the ones often used in the project to be translated properly and consistently.
You can check our ton-i18n-glossary to see how we made it.
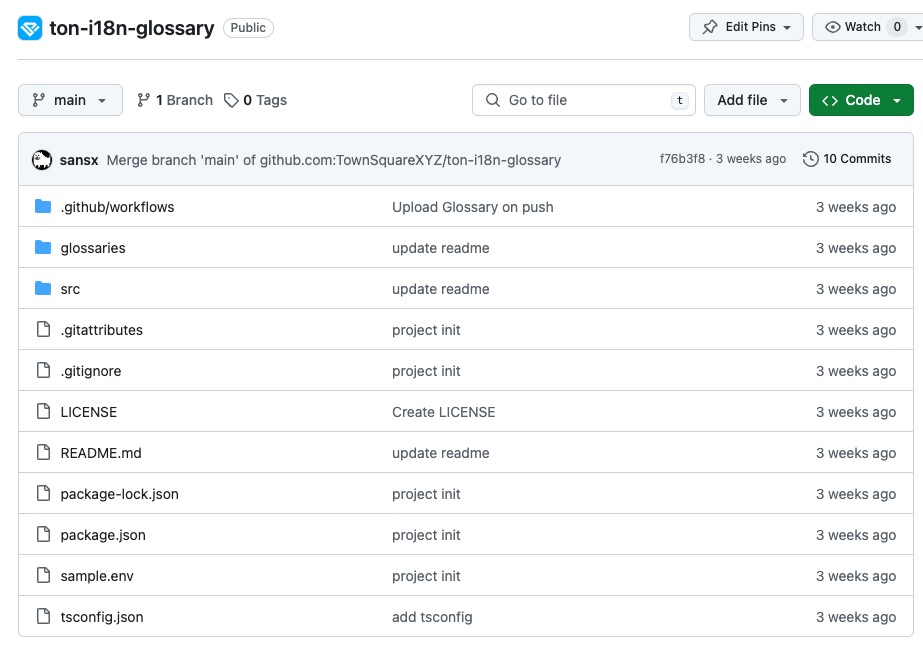
How to set up glossary for a new language?
Luckily, most translators support glossary.
in crowdin, after we set glossary, each glossary term is displayed as an underlined word in the Editor. Hover over the underlined term to highlight it and see its translation, part of speech, and definition (if they are provided).
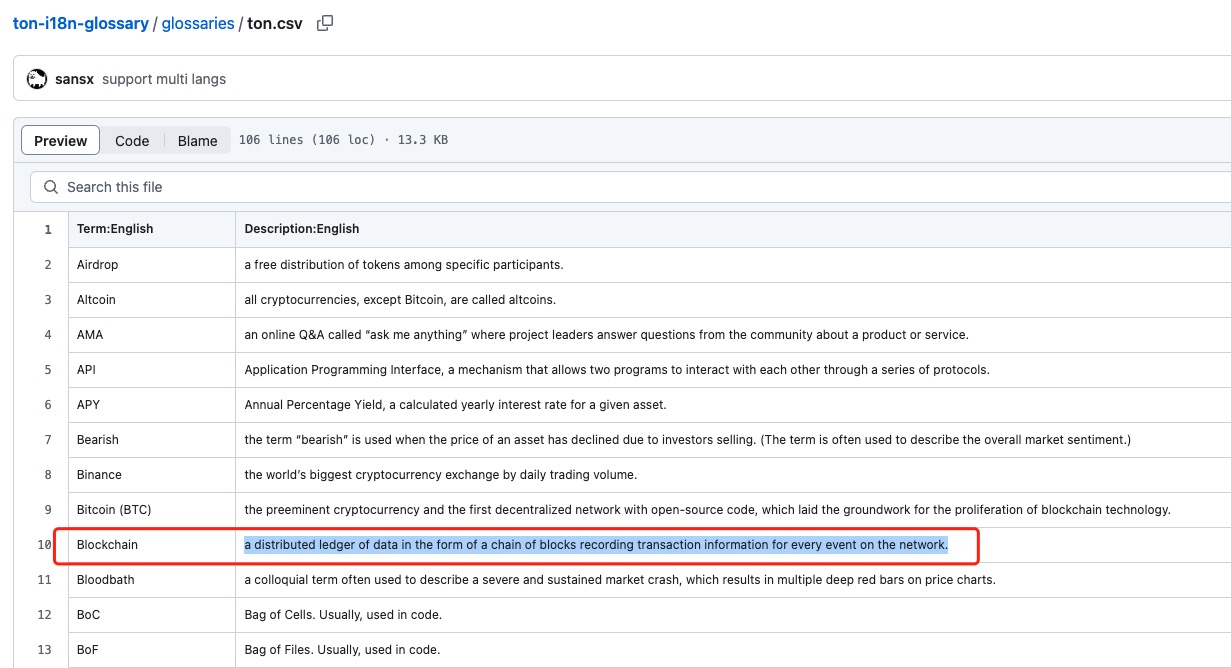
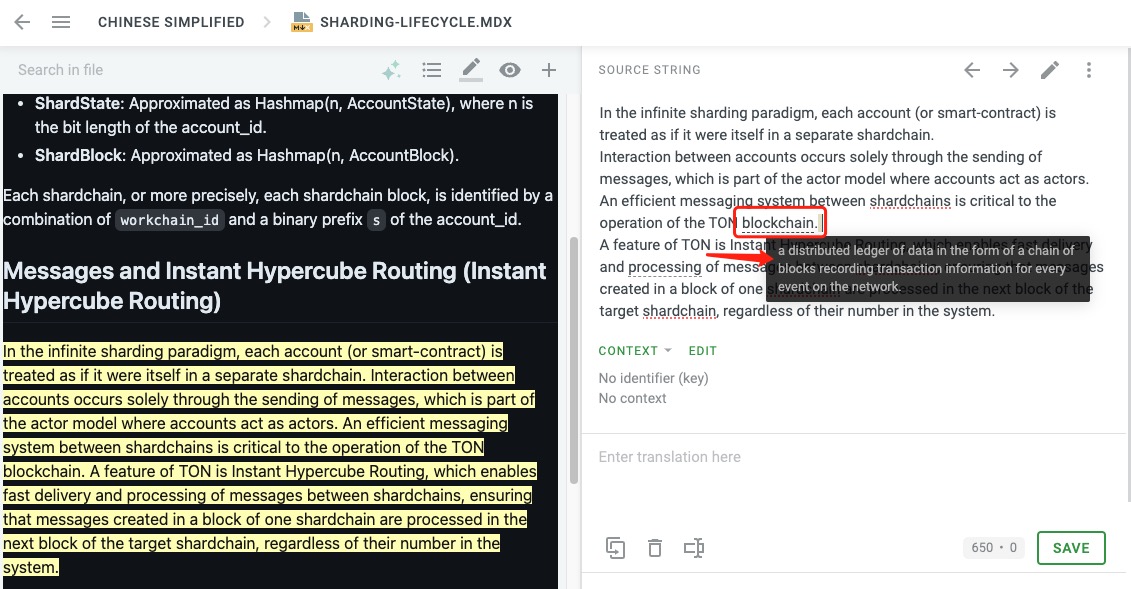
In deepl, we just need to upload our glossary, and then deepl will use it in AI translate automatically.
We already made a program for glossary and will auto-upload them every time after we update glossary.
You just need to know how to set your term into glossary that's all.
if there is an English term already exists in glossary, you can go find that line of the term, find the column of the language you wanna translate, input your translate then upload it, that's all, new glossary will be ready in a few mins
if you wanna upload a new glossary, clone project run:
- `npm i`

- `npm run generate -- <glossary name you want>`,
then repeat step 1.
simple and efficient, isn't it?
How to take advantage of AI translation copilot?
AI translation copilot can be a real asset for breaking down language barriers. You will find out these advantages gradually by using it more and more:
- Enhanced Consistency - due to AI translation are based on the information from the newest internet, which will give you the most correct and updated translations you want.
- Speed and Efficiency - AI translation can be done instantaneously, handling large volumes of content in real-time. With just a few seconds, it can translate text or speech into another language.
- Robust Scalability - AI translation systems continuously learn and improve. As training data expands and algorithms are optimized, translation quality keeps getting better. With glossary we provided, AI translation can be customized to cater to the unique needs of different repo.
Just need a few steps, we can use AI translation in crowdin, in our project we use deepl:
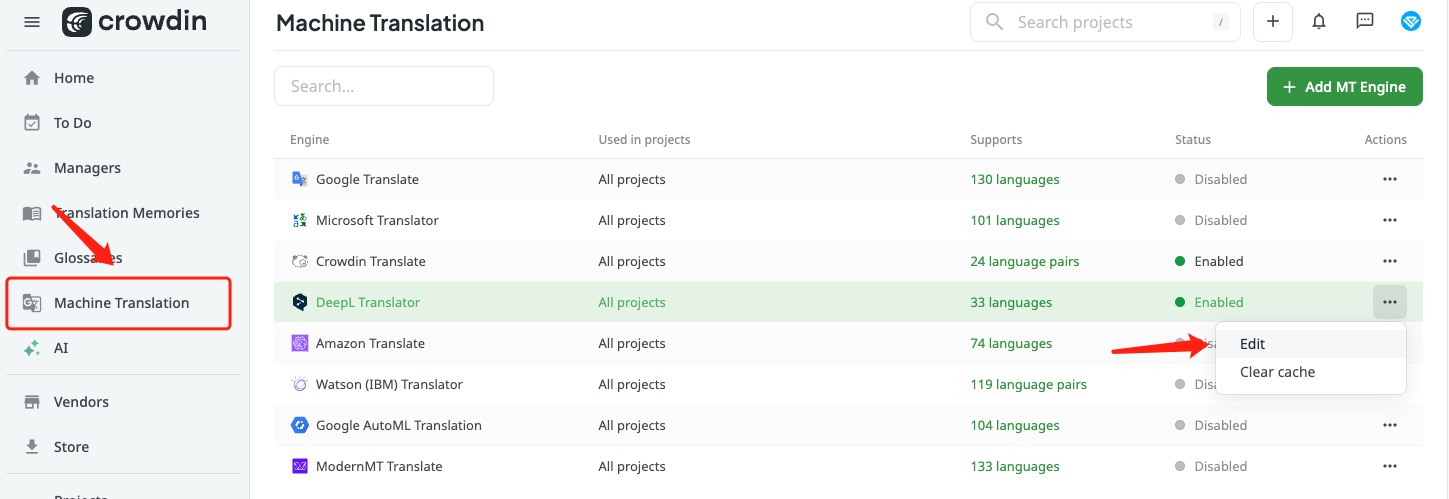
- select Machine Translation in our crowdin menu, in deepl line click edit
- enable deepl support, and input DeepL Translator API key.
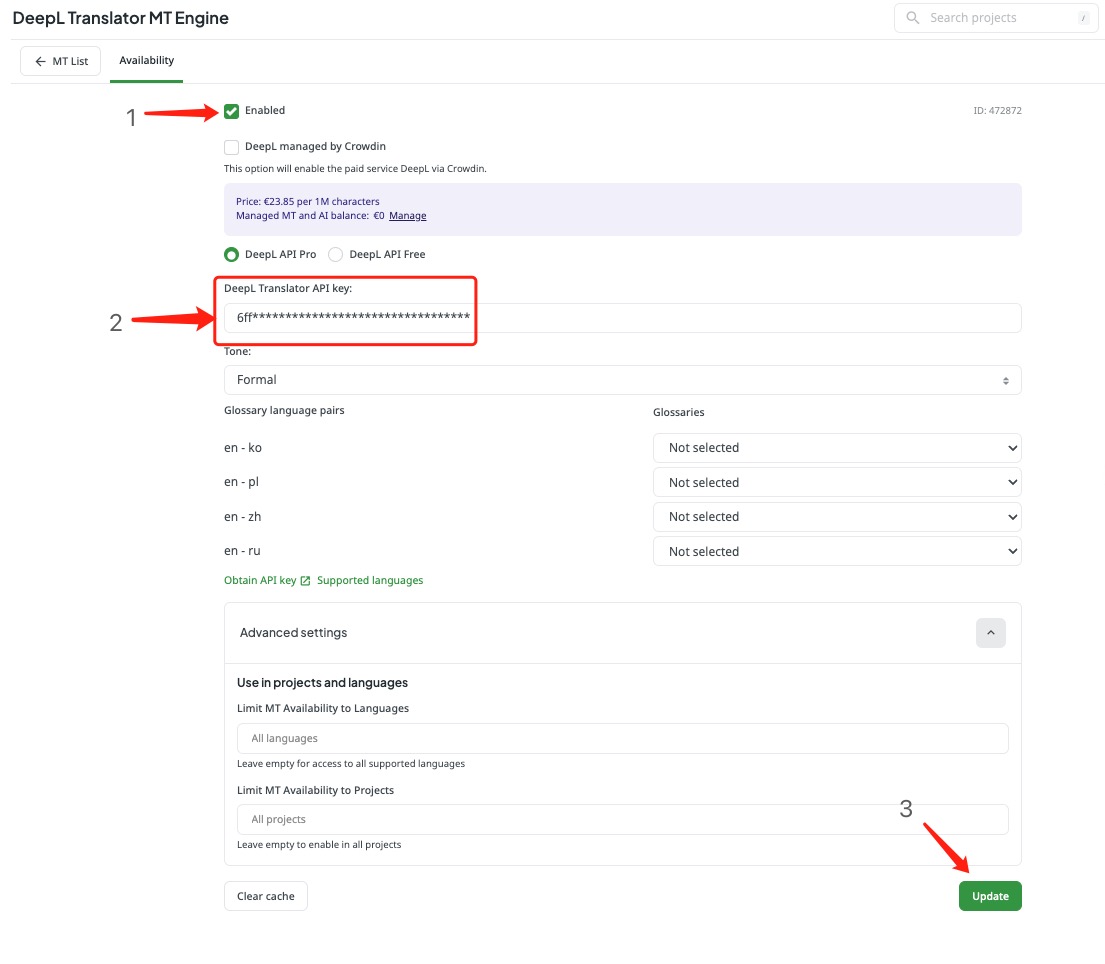 3. our deepl already used customized glossary, again, you can check ton i18n glossary to see how we upload that.
4. back to repo, click Pre-translation select via Machine Translation,
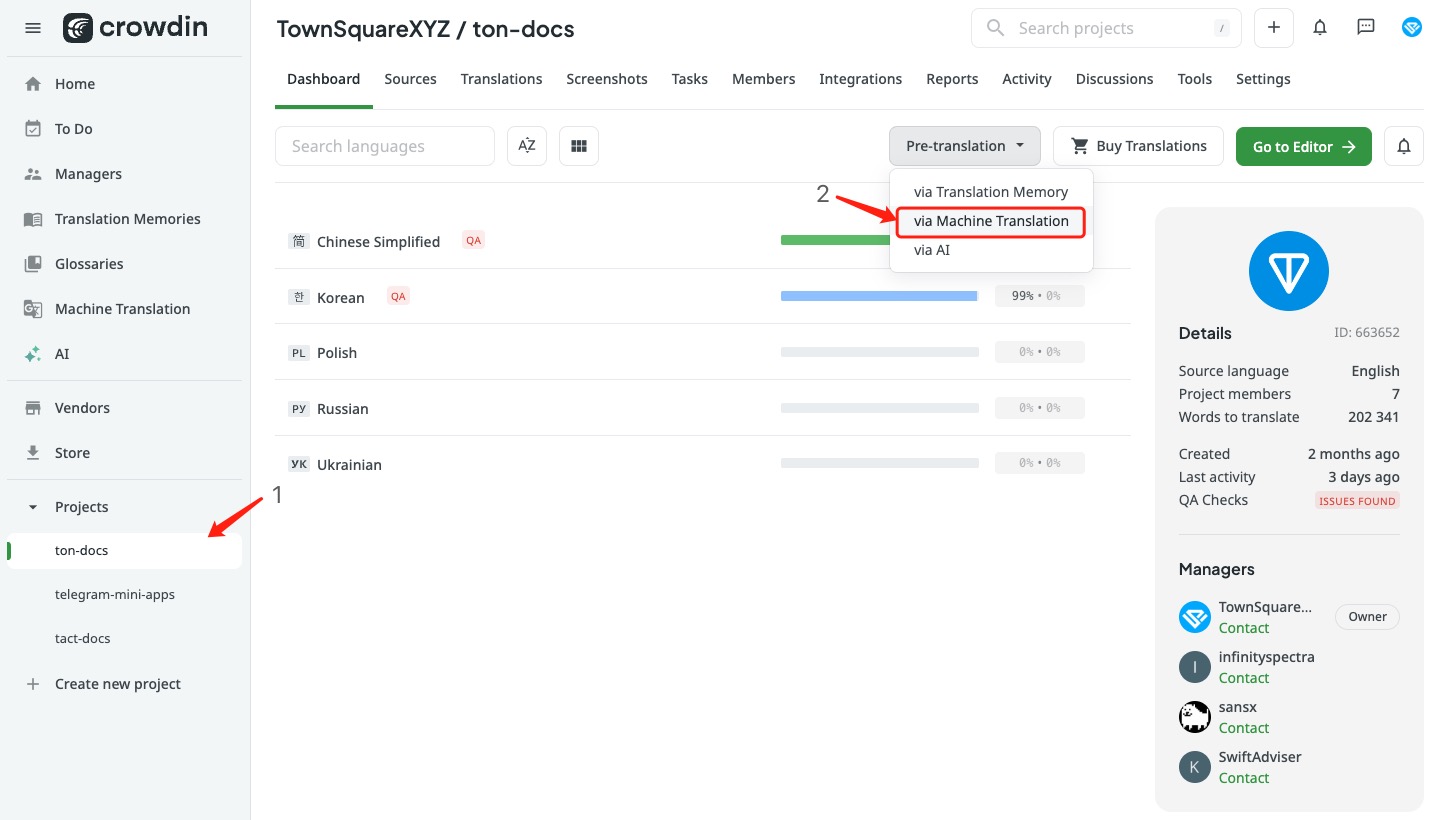 5. use our deepl as Translation Engine, choose the target languages you wanna translate, and select files,
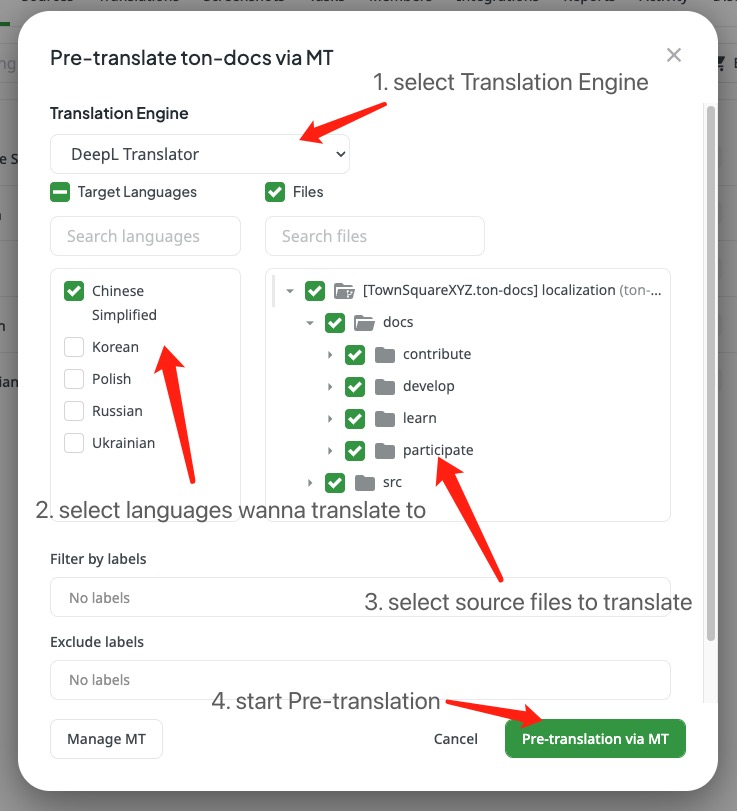
that's all, now you can take a break and wait for pre-translation done.